


14 Dec 33 Incredibly Useful Things You Didn’t Know Google Photos Could Do
With its seamless cloud storage, platform-agnostic syncing, and simple options for sharing, Google Photos has shown that managing even a massive collection of digital images doesn’t have to be a nightmare. And there’s even more to this app than meets the eye.
Ahead of the snapshot-heavy holiday season, it’s worth enlightening yourself about some of Photos’ less obvious but eminently useful options. They’ll save you time, enrich your images, and help you make the most of your ever-growing library of memories.
Make The Most Of Your Storage
1. Want to keep a perpetually synced local backup of your entire Photos collection? Photos may not appear to offer such an option on the surface, but there is a way: First, sign in to Google Drive on the web, then click the gear icon in the site’s upper-right corner and select “Settings.” Make sure the option to “Automatically put your Google Photos into a folder in My Drive” is checked.
Next, download and install Google’s Backup and Sync app for Mac or Windows and configure it to sync your new Drive-based Photos folder with a local folder on your computer. And that’s it: Anything uploaded into Photos will now also appear in Drive and thus be synced to your Mac or PC for extra safekeeping.
2. If a one-time download is what you’re after, you can grab your entire Photos library or any specific set of albums in bulk by using Google’s Takeout service.
3. When your phone gets low on local space, Photos has an easy way to clear up room: Just look for the aptly named “Free up space” option within the Android or iOS app’s main menu. That’ll remove locally stored copies of all photos and videos that are already backed up to Photos and thus always accessible to you (so long as you have an active data connection).

4. Speaking of syncing files from your phone to Photos, make sure Google isn’t eating up your monthly mobile data allotment with its ongoing backups. Open up the app’s settings on your phone, select “Back up & sync,” and check that the toggles for both “Photos” and “Videos” are deactivated under the “Cellular data backup” section. That’ll limit the app’s backups to times when you’re connected to Wi-Fi—which, for most people, is the more sensible overall choice.
5. Google Photos provides unlimited space for cloud-based backups, but there’s a catch: You have to use the service’s “high-quality” setting, which limits photos to 16MP and videos to 1080p resolution. If you’ve uploaded super-high-res photos or videos at their full original size and are running low on Photos storage, you can retroactively compress those files and reclaim the space by going to Photos’ settings on the web and clicking the “Recover Storage” button.
Get More Done In Less Time
6. Quickly zoom in or out on the main gallery view in Photos’ mobile apps—among four different density levels—by pinching in or out on the screen.
7. Once you’ve reached the closest possible view, you can pinch out on any individual image to open it in full—and then pinch back in to close the image and go back to your gallery.
8. Another handy hidden shortcut: While viewing a photo, swipe up or down on the screen to fling it away and return to the gallery view.
9. Using Photos on a Windows PC or Mac? Don’t feel left out: You can find a full list of helpful keyboard shortcuts by pressing Ctrl-? (or Cmd-?) from any area of the Photos web app.
Search Like A Pro
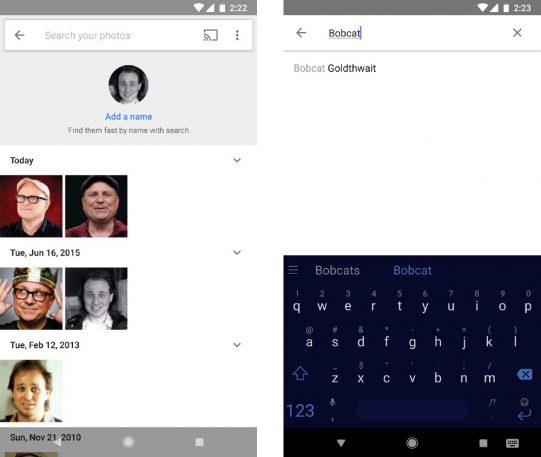
10. Google Photos can learn the faces of people in your pictures, but it’s up to you to take advantage of the feature’s organizational potential. Tap or click the app’s search bar and look for the row of shiny, happy people that pops up—then take a moment to tell Photos who each person is by tapping or clicking a face, tapping or clicking “Add a name,” and then inputting the person’s name or nickname. That’ll open up some interesting new possibilities for search, as you’ll see in a moment.
11. You can correct Photos’ inevitable errors with facial recognition by manually merging two separate groupings of the same face together. Just type the same name into both sections, and Photos will prompt you to combine them. You can also manually remove photos from a person’s section by opening that page and then looking for the “Remove results” option in the overflow menu.
12. If Photos recognizes faces you’d rather not see in your searches, open the overflow menu on the “People” screen, select “Show & hide faces,” and then click on any folks you want to hide.
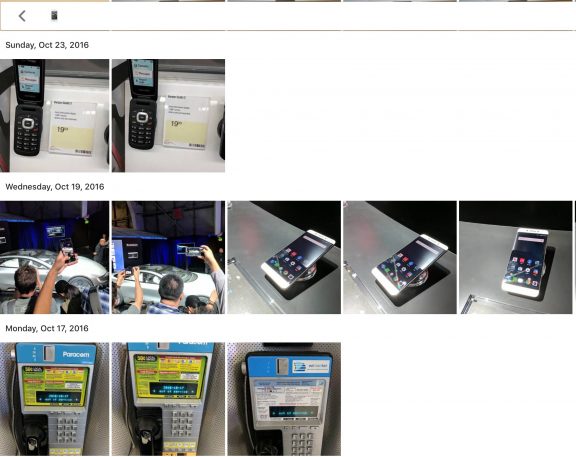
13. Photos is able to do some pretty nifty stuff with search beyond the obvious queries. Tap or click the search bar in the mobile app or website and try searching for terms like “birthday,” “wedding,” “Thanksgiving,” “swimming,” “beaches,” “dancing,” “concerts,” “food,” “sky,” and “rainbows.” You can also search for specific types of shots—videos, selfies, animations, screenshots, and so on—and even for photos containing a particular color.
14. Try combining multiple search terms together for even more detailed discovery. Simple queries like “dog and park” will work, but the real power comes from combining people’s names with places or things to find super-specific items from your library. For instance, if you had identified someone in your collection as Gertrude, you could search for “Gertrude Paris,” “Gertrude birthday,” “Gertrude museum,” “Gertrude purple”—the possibilities are practically endless.

15. It may sound like a classic Google April Fools’ prank, but this is 100% real: Google Photos can now identify and search for pets. Just give Photos the name of your favorite kitten or canine (using the same name-assigning system described above), then search for “Fido park” or whatever tickles your fancy.
16. Got multiple four-legged friends in your life? Try searching Photos for specific breeds of animals—beagle, bulldog, you name it.
17. This one’s more of a parlor trick, but if you have a willing audience and want to show off a bit, search your Photos library by emoji. For example, you could try a hat emoji to find photos with Stetsons and fedoras or a baby for pictures with infants.
Optimize Your Images
18. When editing an image within Photos, you can compare the changes to your original image by touching your finger to the photo for about a second. That’ll make any edits disappear temporarily; when you lift your finger, the changes will reappear.
19. Want to make the effects from one of Photos’ filters a little less intense? After selecting a filter in the mobile app, touch and hold its icon for a second and then let go. That’ll pull up a slider that’ll let you adjust the filter’s strength.
20. Be aware: By default, Photos will always overwrite your original image when you hit “Save” within its editor. If you want to save changes as a separate copy, open the editor’s overflow menu and select the “Save copy” option that’s tucked away there.
21. Make an image with sea or sky really pop by cranking up Photos’ “Deep Blue” setting. While editing an image, tap the second icon from the left, then tap the down-facing arrow next to “Color” to find the option.
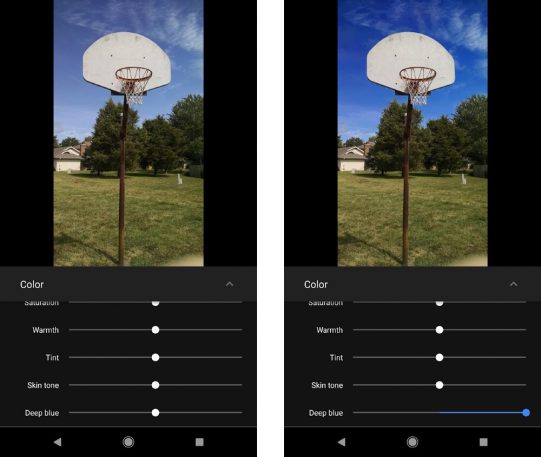
22. Make an image with lots of green look especially lush by pushing the “Saturation” slider in that same section as high as it’ll go, then bringing the “Skin Tone” and “Deep Blue” sliders down to low values.
23. Save yourself time by copying and pasting your edits from one photo to another: On the Photos website, hit Ctrl-C (or Cmd-C) from the photo editing screen. Then open your next photo in the editor and hit Ctrl-V (or Cmd-V) to apply the same set of tweaks.
24. If you use an external app for more advanced on-the-go editing—like Snapseed or Photoshop Express—you can beam a photo directly from Photos by looking for the “Edit in . . . ” option in the image’s overflow menu. You can also tap the icon that looks like a bunch of tiny boxes on the far right of Photos’ editing screen.
Add Even More Stuff (Or Remove It)
25. Got images on your phone from Facebook, Twitter, or other downloaded sources? On Android, Photos can back those up to your collection automatically: Open the “Back up & sync” section of the app’s settings, then tap the line labeled “Back up device folders.” You’ll see a list of image-containing folders from your phone’s local storage and can opt to keep any of them synced with your Photos library.
26. If you ever store images in Google Drive, you can make them show up in your Photos collection as well. All you have to do is activate the “Google Drive” option in Photos’ settings (on mobile or the web).
27. Google Photos has a companion app that makes it incredibly easy to bring printed photos into your digital collection. Just grab the PhotoScan app for Android or iOS to get started.
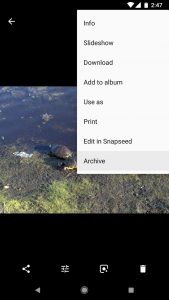
28. See something you’d rather not have show up in your main Photos gallery—maybe a dull screenshot or a photo with, shall we say, sensitive content? Tap or long-press the image, then open the overflow menu and select “Archive.” That’ll keep it out of sight while you’re scrolling but still allow it to appear in searches and in any albums to which it’s been added.
29. Photos does have an option to permanently delete images and videos—but if you axe something by accident, don’t panic: Anything deleted from your Photos library will remain in a “Trash” folder for 60 days (unless you manually empty said folder). You can find it in the main Photos menu and, from there, restore or permanently delete any item with a couple of taps.
Share The Wealth
30. You already know about Photos’ spectacular options for sharing, but you may not know the service also has the ability to automate the process and do all the legwork for you. The feature is designed for situations in which you always want to share a particular type of photo with a specific person—like photos of your child with a partner or a parent, for example. You just specify the faces you want included in the auto-shares and the date at which the sharing begins, then Photos handles the rest. Look for the “Add partner account” option in Photos’ main menu to set up a connection.
31. Oddly enough, Google Photos isn’t linked directly to Gmail, which can be a bummer if you want to quickly attach images from your collection to an outgoing message. But fear not, for there’s a workaround: Remember way back at our very first tip, when we talked about how you can create a Photos folder within Drive? Once you’ve done that, you can use Gmail’s “Insert files using Drive” icon to grab anything from Photos via that always-synced folder.
32. Photos also has a little-known link to YouTube, in case you ever feel like sharing some of your Oscar-caliber videos in that venue: Just meander over to the YouTube upload page on the web and look for the option to import videos from your Google Photos library. You’ll find a simple click-and-select tool that’ll let you select and pull over as many clips as you want for publication.
33. Apple’s Live Photos and Google’s Motion Photos are both oodles of fun, but they also both suffer from the same pesky limitation: All the motion in their images is lost when the files are shared directly with an incompatible phone. Here’s the fix: When viewing any Live Photos or Motion Photos item within Photos, open the overflow menu, and select “Save as video.” That’ll convert your creation into a regular, universally compatible video for all of your friends and family to enjoy.
Source: Fast Company
Sorry, the comment form is closed at this time.